$4.95 / mo
Take your prints to the next level: new advanced settings in REALvision Online: Material settings
REALvision Online now includes advanced settings, check out our expert tips on Material settings to fine-tune your prints✨

In the last article, we explored the new advanced Object settings in REALvision Online. Now, it’s time to dive into the material side of things — and discover how much more control you really have with the new advanced Material settings.
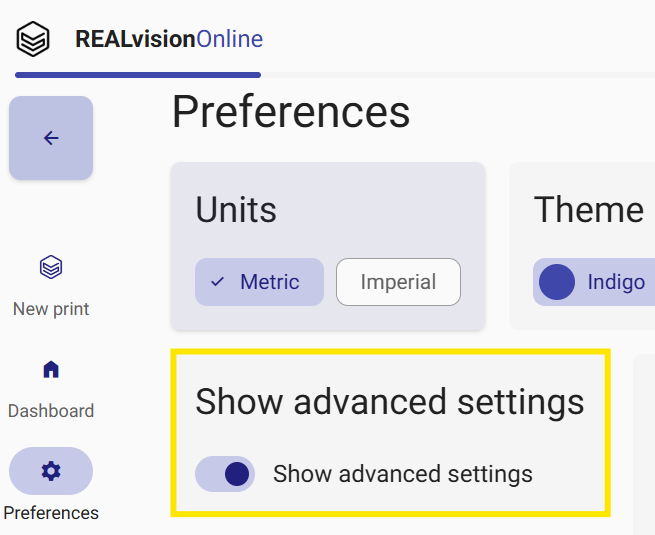
By default, these settings are hidden—keeping things clean and simple. When you’re ready, just head over to the Preferences tab and flip the switch.👇

Material settings: fine-tune the magic
No matter what material you’re printing with — PLA, PETG, TPU, ABS, or something more advanced — getting the right temperature and flow is key to getting a strong, clean, and reliable print.
If your temperatures are too low, layers might not bond. Too high, and you risk stringing, blobs, or even heat damage. The same goes for flow — too much, and your print looks overstuffed; too little, and you get gaps or weak walls.
Temperature settings
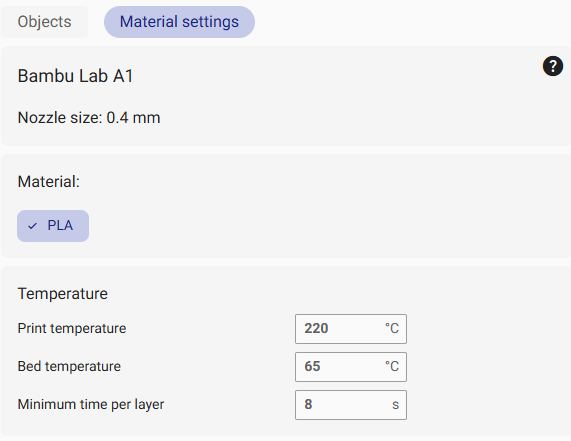
1. Print temperature
Adjust your print and bed temperatures, and even tweak the minimum time per layer to avoid overheating.
The nozzle temperature controls how hot the filament gets as it melts and flows out of the printer. Different temperatures should be used with different materials. The general guidelines are as follows:
PLA: 190–210°C
PETG: 220–250°C
TPU: 220–240°C
ABS: 230–250°C
If the temperature is too low, you can expect poor layer bonding, under-extrusion or rough surfaces. If it is too high, stringing, blobs, and oozing can happen. Always start in the recommended range and fine-tune if you notice problems like stringing or brittleness.
2. Bed temperature
The bed temperature is the heat of the build plate, which helps the first layers stick properly and reduces warping. Different temperatures should be used with different materials. The general guidelines are as follows:
PLA: 50–60°C
PETG: 70–90°C
TPU: 50–60°C
ABS: 90–110°C
If the temperature is too low, the corners of the print might lift or warp. If it is too high, it can soften or deform the bottom layers.
Tip: use a brim or raft along with bed heat for extra grip on tricky materials.
3. Minimum time per layer
This controls how much time your printer gives a layer to cool before starting the next one. It’s especially useful for small or detailed parts, where layers are printed quickly and can overheat.
Why it matters: If hot layers are printed on top of still-soft ones, details melt or deform
How to fix it: Increase this value slightly if small parts look saggy or mushy
Extrusion controls
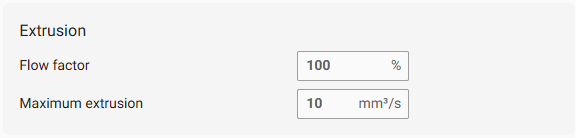
Change the flow factor or cap the maximum extrusion for cleaner prints. Extrusion settings determine how much filament your printer pushes out during a print. Getting this right is crucial for clean layers, strong parts, and reliable results.
If your printer extrudes too much, your prints can look overfilled, blobby, or stringy. If it extrudes too little, you’ll get gaps, weak layers, or brittle walls.
REALvision Online’s advanced material settings now let you control two key parameters:
1. Flow factor
Flow factor adjusts the overall amount of filament extruded, typically shown as a percentage.
100% = standard amount based on the slicer’s calculations
100% = more material
<100% = less material
When to adjust it:
– If your printer is over-extruding (edges are bulging or too thick), try reducing to 95–98%
– If your printer is under-extruding (gaps between walls, weak infill), try increasing to 102–105%
Tip: Start with small changes (±2%) and test on a small object first.
2. Maximum extrusion
Maximum extrusion sets a cap on how fast filament can be pushed out, measured in mm³/s. It helps prevent problems like grinding or nozzle jams when printing at high speeds.
Why it matters:
Each printer and material has a limit to how fast it can reliably melt and extrude filament. If your speed is too high and this cap is not in place, your printer might try to push plastic faster than it can melt.
When to use it:
– You’re printing fast and getting uneven layers or under-extrusion
– You hear clicking or grinding sounds from the extruder
– You want to optimize print quality on fast settings
Retraction settings
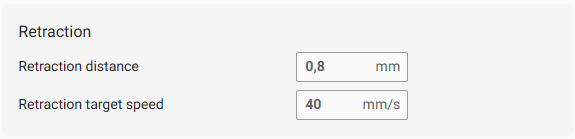
Tame stringing with control over retraction distance and target speed. Retraction is when your 3D printer pulls filament back slightly during travel moves — that is, when the print head moves from one place to another without printing.
Why? To stop melted filament from oozing out and leaving behind thin, unwanted strands of plastic — also known as stringing or webbing.
By adjusting retraction distance and retraction speed, you can control how clean your prints look — especially on models with lots of gaps, towers, or detailed geometry.
1. Retraction distance
Retraction distance is the length of filament the printer pulls back when it stops printing and starts moving.
Typical range:
– Direct drive extruders: 0.5 – 2 mm
– Bowden extruders: 4 – 7 mm (they need more due to longer filament path)
When to adjust it:
– If you see stringing: increase retraction distance slightly
– If filament gets stuck or jammed: lower the distance
Tip: Start with small changes, like 0.5 mm at a time.
2. Retraction speed
Retraction speed means how fast the printer retracts the filament.
Typical range:
– 20 – 60 mm/s
– Faster speeds mean quicker retraction but may cause grinding if too high
When to adjust it:
– If retraction isn’t fast enough to stop oozing → increase speed
– If you hear clicking or see filament grinding → lower speed a bit
Speed tweaks
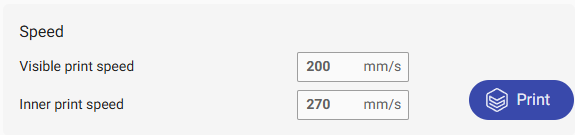
Get smoother surfaces by adjusting visible and inner print speeds. Visible print speed and inner print speed settings give you more control over how your model is built — and how it looks when it’s done.
1. Visible print speed
This controls the speed for the outermost layer of your print — the one you can see and touch.
Why it matters:
Slowing down this speed gives the filament more time to settle neatly into place, resulting in:
– Smoother surfaces
– Cleaner edges
– Better-looking details
When to slow it down:
– You want a high-quality surface finish
– You’re printing curves, lettering, or visible details
– You’re using tricky materials like PETG that benefit from slower speeds
2. Inner print speed
This controls how fast the inside parts of the model are printed — this includes infill and inner perimeters (walls that aren’t visible).
Why it matters:
Since these parts don’t affect appearance directly, you can print them faster to reduce print time.
Typical inner speeds:
– 60–90 mm/s for most materials
– Even higher if your printer can handle it and the part doesn’t need high strength
Below are suggested starting points for commonly used materials for all the settings you have just learned about:
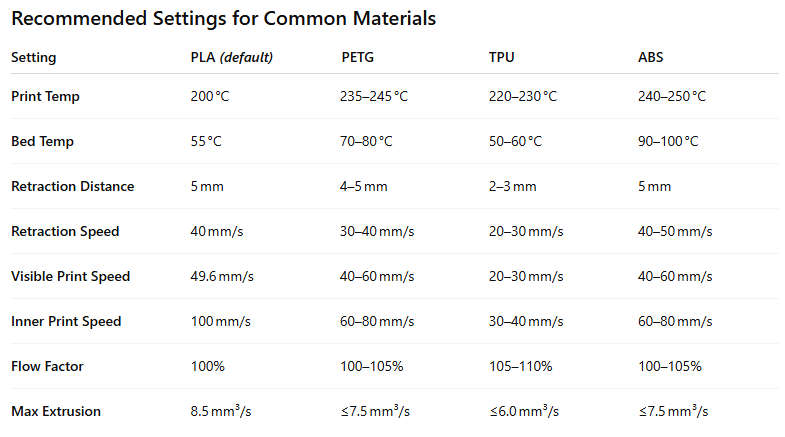
Please note these are just starting points — for optimal results, you may need to fine-tune based on your specific filament brand and model.
Ready to try it out?
Head over to the Preferences tab in REALvision Online and enable Advanced Settings. Play around, tweak a few things, and see what kind of magic you can make. 🔧✨
Happy printing!
– The REALvision Online Team
